In this tutorial I'm going to show you how to setup and configure the LCD for BeagleBone Black.
I was made a lot of custom HMI with graphic LCD and the micro-controller like AVR and PIC.
It's very interesting for me to bring all experiences in HMI design with micro-controller on
something like BBB.
Since few month ago that I'v starting working on a project which involve graphic LCD I found
for connecting the BBB to LCD there is LCD capes.
Because some of these capes was discontinued and on the other hand they are little pricey, they
aren't useful for mass production.
All the capes has a EEPROM which configure the kernel in a boot time. It means you couldn't
see your BBB graphical output on LCD by connecting correspond pins on LCD and BBB if you don't use LCD Cape.
I will bring all the steps you need to connect the single LCD to your BBB and how to configure them
to get your graphical output on your LCD.
These are my hardware and software configurations and you will have all this configuration by
following this tutorial:
LCD 4.3" 480 X 272 :PH480272_005_I11Q
BBB rev C
BBB OS: Debian Wheezy 7.8 Debian (BeagleBone, BeagleBone Black - 4GB SD) 2015-03-01
Host OS:Mac
Guest OS: Debian Jessie
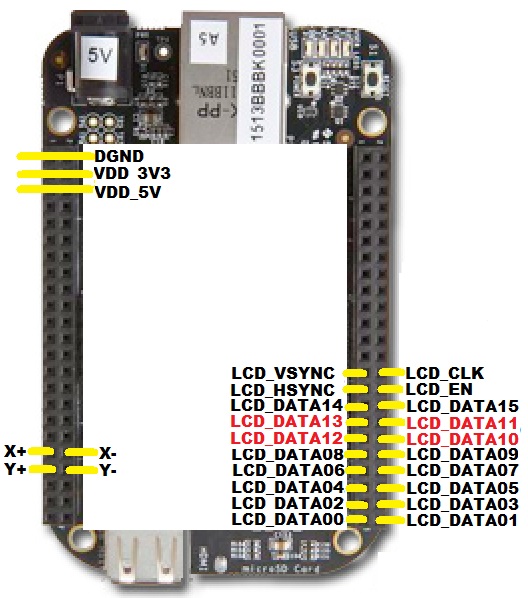
Step 1.connecting LCD to BBB.
Please connect the correspond LCD pins to BBB as follow. Please beware about LCD DATA 10 ~13, since they aren't in a correct order.
(I used the LCD with built in Back light driver, you have to beware about back light on your LCD. usually all the back light LED needs 18 or more voltage to find out this read LCD datasheet) This is the datasheet for my LCD
http://ww1.microchip.com/downloads/en/devicedoc/spf-ph480272t-005-i11q_0021.pdf
Step 2. Installing Virtual Box and Debian.
For keep this tutorial as consistence as possible, use Debian on Virtual Box.
As you know you can connect to your BBB with "ssh" command from Mac command line.
Download the latest version of the Virtual Box from https://www.virtualbox.org/wiki/Downloads
and install it. for running Debian you need to have image of Debian for download it go to this website
https://www.debian.org/releases/jessie/debian-installer/
and under title "netinst CD image (generally 150-280 MB)"
chose "amd64" after download done, go to VirtualBox and install Debian on it. If you need help for installing
VirtualBox and Debian, you can find many YouTube tutorial in internet.
Step 3. Updating BBB image.
Beagle Bone Black ship withe Debian Wheezy 7.4. As BBB tutorial website suggested it's better you upgrade it with
latest image you can get the latest image from here : http://beagleboard.org/latest-images.
There is a very good tutorial on how you can make the image on SD card in "getting started" section of BBB original
Website: http://beagleboard.org/getting-started
Follow the instruction to make an image.
Step 4. Connecting to the BBB and downloading desire device tree.
Device Tree or (DT) is the data structure which pass all the hardware details to the OS in a boot time. For
more information take a look at this website: http://elinux.org/BeagleBone_and_the_3.8_Kernel
All the DT in BBB has a extension (dts for source file and dtbo for object file) .
In case you want to modify something to DT you can modify dtc and make an object file from.
In older images of Debian(like Wheezy 7.4) all the LCD cape dts and dtbo in was came with the image but in latest
image you couldn't find them in a same place.
All the object files located in /lib/firmware.
For connecting to your BBB if you followed "Step 2" you can connect to board with USB cable.
All the texts in orange means command you enter and all the red means the output beware
all command is case sensitive which means "SSH" is different than "ssh"
In this stage just go to terminal line and type:
MacBook-Pro:~ HostMachin$ ssh root@192.168.7.2
Warning: Permanently added '192.168.7.2' (RSA) to the list of known hosts.
Debian GNU/Linux 7
BeagleBoard.org Debian Image 2015-03-01
Support/FAQ: http://elinux.org/Beagleboard:BeagleBoneBlack_Debian
default username:password is [debian:temppwd]
root@beaglebone:~#
As you see the third line shows the version of image which in our case is 2015-03-01.
You can see the version of the Debian by entering this command:
root@beaglebone:~# lsb_release -a
No LSB modules are available.
Distributor ID: Debian
Description: Debian GNU/Linux 7.8 (wheezy)
Release: 7.8
Codename: wheezy
If all the outputs are like above. Then you can continue.
In this stage we want to copy the bb.org-overlays which include all dtbo files to our BBB. For doing this we need
to use the git clone command this command making a copy of all file you need in your destination.
For instance we need to copy "bb.org-overlays" which is located in this link:
https://github.com/beagleboard/bb.org-overlays
For doing this you need to enter this command in a command line:
root@beaglebone:~# git clone https://github.com/beagleboard/bb.org-overlays
Cloning into 'bb.org-overlays'...
remote: Counting objects: 262, done.
remote: Compressing objects: 100% (4/4), done.
remote: Total 262 (delta 0), reused 0 (delta 0), pack-reused 258
Receiving objects: 100% (262/262), 65.49 KiB, done.
Resolving deltas: 100% (135/135), done.
After this command if you enter this command "ls" you see the "bb.org-overlays" added to your directory
root@beaglebone:~# ls
bb.org-overlays
Before do anything let see what is the current device tree version on your BBB you can get this information by
typing:
root@beaglebone:~# dtc --version
Version: DTC 1.4.0
Enter to "bb.org-overlays" directory and enter this "./dtc-overlay.sh"
root@beaglebone:~/bb.org-overlays# ./dtc-overlay.sh
loning into '/root/git/dtc'...
remote: Counting objects: 3074, done.
remote: Compressing objects: 100% (326/326), done.
remote: Total 3074 (delta 197), reused 0 (delta 0)
Receiving objects: 100% (3074/3074), 769.98 KiB | 725 KiB/s, done.
.
.
.
LD libfdt/libfdt-1.4.1.so
Installing into: /usr/local/bin/
CHK version_gen.h
INSTALL-BIN
INSTALL-LIB
INSTALL-INC
Now you have to enter to the directory by "cd" and get the directory list again with "ls"
root@beaglebone:~# cd bb.org-overlays
root@beaglebone:~/bb.org-overlays# ls
dtc-overlay.sh include install.sh Makefile readme.md scripts src
Then use "./install.sh" to install DT:
root@beaglebone:~/bb.org-overlays# ./install.sh
Installing: bb-customizations
Get:1 http://repos.rcn-ee.net wheezy Release.gpg [819 B]
Get:2 http://ftp.us.debian.org wheezy Release.gpg [2,390 B]
.
.
.
`src/arm/BB-UART5-00A0.dtbo' -> `/lib/firmware/BB-UART5-00A0.dtbo'
`src/arm/cape-CBB-Serial-r01.dtbo' -> `/lib/firmware/cape-CBB-Serial-r01.dtbo'
update-initramfs: Generating /boot/initrd.img-3.8.13-bone70
cape overlays have been built and added to /lib/firmware & /boot/initrd.img-3.8.13-bone70, please reboot
As you see in the last line of the output cape overlays added successfully in /lib/firmware directory for make it effect on your BBB you have to reboot your BBB by typing "reboot"
root@beaglebone:~/bb.org-overlays# reboot
Broadcast message from root@beaglebone (pts/0) (Thu May 28 01:17:49 2015):
The system is going down for reboot NOW!
When the BBB boot up again, type "dtc --version" and now you have to see something like this
root@beaglebone:~# dtc --version
Version: DTC 1.4.1-g8aaa0eba
Step 5. Add LCD4 to boot.
Now is the time for add LCD4 to your boot which make your BBB boot up on LCD instead HMI
Just type this command to enter to uEnv.txt
Beware if you are not a super user and you are not in root use "sudo" command before above command.
root@beaglebone:~#nano /boot/uEnv.txt
#Docs: http://elinux.org/Beagleboard:U-boot_partitioning_layout_2.0
uname_r=3.8.13-bone70
#dtb=
cmdline=quiet init=/lib/systemd/systemd
##Example
#cape_disable=capemgr.disable_partno=
cape_enable=capemgr.enable_partno=BB-BONE-LCD4-01
##Disable HDMI/eMMC
#cape_disable=capemgr.disable_partno=BB-BONELT-HDMI,BB-BONELT-HDMIN,BB-BONE-EMMC-2G
##Disable HDMI
#cape_disable=capemgr.disable_partno=BB-BONELT-HDMI,BB-BONELT-HDMIN
##Disable eMMC
#cape_disable=capemgr.disable_partno=BB-BONE-EMMC-2G
##Audio Cape (needs HDMI Audio disabled)
#cape_disable=capemgr.disable_partno=BB-BONELT-HDMI
#cape_enable=capemgr.enable_partno=BB-BONE-AUDI-02
##enable BBB: eMMC Flasher:
##make sure, these tools are installed: dosfstools rsync
#cmdline=init=/opt/scripts/tools/eMMC/init-eMMC-flasher-v3.sh
As you see in this output the line that should be changed in your "uEnv.txt", is colored in blue.
Make that line in your BBB as the blue line and push "ctrl+x" "y" "enter"
now when you reboot your BBB it will come up on LCD.
I was made a lot of custom HMI with graphic LCD and the micro-controller like AVR and PIC.
It's very interesting for me to bring all experiences in HMI design with micro-controller on
something like BBB.
Since few month ago that I'v starting working on a project which involve graphic LCD I found
for connecting the BBB to LCD there is LCD capes.
Because some of these capes was discontinued and on the other hand they are little pricey, they
aren't useful for mass production.
All the capes has a EEPROM which configure the kernel in a boot time. It means you couldn't
see your BBB graphical output on LCD by connecting correspond pins on LCD and BBB if you don't use LCD Cape.
I will bring all the steps you need to connect the single LCD to your BBB and how to configure them
to get your graphical output on your LCD.
These are my hardware and software configurations and you will have all this configuration by
following this tutorial:
LCD 4.3" 480 X 272 :PH480272_005_I11Q
BBB rev C
BBB OS: Debian Wheezy 7.8 Debian (BeagleBone, BeagleBone Black - 4GB SD) 2015-03-01
Host OS:Mac
Guest OS: Debian Jessie
Step 1.connecting LCD to BBB.
Please connect the correspond LCD pins to BBB as follow. Please beware about LCD DATA 10 ~13, since they aren't in a correct order.
(I used the LCD with built in Back light driver, you have to beware about back light on your LCD. usually all the back light LED needs 18 or more voltage to find out this read LCD datasheet) This is the datasheet for my LCD
http://ww1.microchip.com/downloads/en/devicedoc/spf-ph480272t-005-i11q_0021.pdf
Step 2. Installing Virtual Box and Debian.
For keep this tutorial as consistence as possible, use Debian on Virtual Box.
As you know you can connect to your BBB with "ssh" command from Mac command line.
Download the latest version of the Virtual Box from https://www.virtualbox.org/wiki/Downloads
and install it. for running Debian you need to have image of Debian for download it go to this website
https://www.debian.org/releases/jessie/debian-installer/
and under title "netinst CD image (generally 150-280 MB)"
chose "amd64" after download done, go to VirtualBox and install Debian on it. If you need help for installing
VirtualBox and Debian, you can find many YouTube tutorial in internet.
Step 3. Updating BBB image.
Beagle Bone Black ship withe Debian Wheezy 7.4. As BBB tutorial website suggested it's better you upgrade it with
latest image you can get the latest image from here : http://beagleboard.org/latest-images.
There is a very good tutorial on how you can make the image on SD card in "getting started" section of BBB original
Website: http://beagleboard.org/getting-started
Follow the instruction to make an image.
Step 4. Connecting to the BBB and downloading desire device tree.
Device Tree or (DT) is the data structure which pass all the hardware details to the OS in a boot time. For
more information take a look at this website: http://elinux.org/BeagleBone_and_the_3.8_Kernel
All the DT in BBB has a extension (dts for source file and dtbo for object file) .
In case you want to modify something to DT you can modify dtc and make an object file from.
In older images of Debian(like Wheezy 7.4) all the LCD cape dts and dtbo in was came with the image but in latest
image you couldn't find them in a same place.
All the object files located in /lib/firmware.
For connecting to your BBB if you followed "Step 2" you can connect to board with USB cable.
All the texts in orange means command you enter and all the red means the output beware
all command is case sensitive which means "SSH" is different than "ssh"
In this stage just go to terminal line and type:
MacBook-Pro:~ HostMachin$ ssh root@192.168.7.2
Warning: Permanently added '192.168.7.2' (RSA) to the list of known hosts.
Debian GNU/Linux 7
BeagleBoard.org Debian Image 2015-03-01
Support/FAQ: http://elinux.org/Beagleboard:BeagleBoneBlack_Debian
default username:password is [debian:temppwd]
root@beaglebone:~#
As you see the third line shows the version of image which in our case is 2015-03-01.
You can see the version of the Debian by entering this command:
root@beaglebone:~# lsb_release -a
No LSB modules are available.
Distributor ID: Debian
Description: Debian GNU/Linux 7.8 (wheezy)
Release: 7.8
Codename: wheezy
If all the outputs are like above. Then you can continue.
In this stage we want to copy the bb.org-overlays which include all dtbo files to our BBB. For doing this we need
to use the git clone command this command making a copy of all file you need in your destination.
For instance we need to copy "bb.org-overlays" which is located in this link:
https://github.com/beagleboard/bb.org-overlays
For doing this you need to enter this command in a command line:
root@beaglebone:~# git clone https://github.com/beagleboard/bb.org-overlays
Cloning into 'bb.org-overlays'...
remote: Counting objects: 262, done.
remote: Compressing objects: 100% (4/4), done.
remote: Total 262 (delta 0), reused 0 (delta 0), pack-reused 258
Receiving objects: 100% (262/262), 65.49 KiB, done.
Resolving deltas: 100% (135/135), done.
After this command if you enter this command "ls" you see the "bb.org-overlays" added to your directory
root@beaglebone:~# ls
bb.org-overlays
Before do anything let see what is the current device tree version on your BBB you can get this information by
typing:
root@beaglebone:~# dtc --version
Version: DTC 1.4.0
Enter to "bb.org-overlays" directory and enter this "./dtc-overlay.sh"
root@beaglebone:~/bb.org-overlays# ./dtc-overlay.sh
loning into '/root/git/dtc'...
remote: Counting objects: 3074, done.
remote: Compressing objects: 100% (326/326), done.
remote: Total 3074 (delta 197), reused 0 (delta 0)
Receiving objects: 100% (3074/3074), 769.98 KiB | 725 KiB/s, done.
.
.
.
LD libfdt/libfdt-1.4.1.so
Installing into: /usr/local/bin/
CHK version_gen.h
INSTALL-BIN
INSTALL-LIB
INSTALL-INC
Now you have to enter to the directory by "cd" and get the directory list again with "ls"
root@beaglebone:~# cd bb.org-overlays
root@beaglebone:~/bb.org-overlays# ls
dtc-overlay.sh include install.sh Makefile readme.md scripts src
Then use "./install.sh" to install DT:
root@beaglebone:~/bb.org-overlays# ./install.sh
Installing: bb-customizations
Get:1 http://repos.rcn-ee.net wheezy Release.gpg [819 B]
Get:2 http://ftp.us.debian.org wheezy Release.gpg [2,390 B]
.
.
.
`src/arm/BB-UART5-00A0.dtbo' -> `/lib/firmware/BB-UART5-00A0.dtbo'
`src/arm/cape-CBB-Serial-r01.dtbo' -> `/lib/firmware/cape-CBB-Serial-r01.dtbo'
update-initramfs: Generating /boot/initrd.img-3.8.13-bone70
cape overlays have been built and added to /lib/firmware & /boot/initrd.img-3.8.13-bone70, please reboot
As you see in the last line of the output cape overlays added successfully in /lib/firmware directory for make it effect on your BBB you have to reboot your BBB by typing "reboot"
root@beaglebone:~/bb.org-overlays# reboot
Broadcast message from root@beaglebone (pts/0) (Thu May 28 01:17:49 2015):
The system is going down for reboot NOW!
When the BBB boot up again, type "dtc --version" and now you have to see something like this
root@beaglebone:~# dtc --version
Version: DTC 1.4.1-g8aaa0eba
Step 5. Add LCD4 to boot.
Now is the time for add LCD4 to your boot which make your BBB boot up on LCD instead HMI
Just type this command to enter to uEnv.txt
Beware if you are not a super user and you are not in root use "sudo" command before above command.
root@beaglebone:~#nano /boot/uEnv.txt
#Docs: http://elinux.org/Beagleboard:U-boot_partitioning_layout_2.0
uname_r=3.8.13-bone70
#dtb=
cmdline=quiet init=/lib/systemd/systemd
##Example
#cape_disable=capemgr.disable_partno=
cape_enable=capemgr.enable_partno=BB-BONE-LCD4-01
##Disable HDMI/eMMC
#cape_disable=capemgr.disable_partno=BB-BONELT-HDMI,BB-BONELT-HDMIN,BB-BONE-EMMC-2G
##Disable HDMI
#cape_disable=capemgr.disable_partno=BB-BONELT-HDMI,BB-BONELT-HDMIN
##Disable eMMC
#cape_disable=capemgr.disable_partno=BB-BONE-EMMC-2G
##Audio Cape (needs HDMI Audio disabled)
#cape_disable=capemgr.disable_partno=BB-BONELT-HDMI
#cape_enable=capemgr.enable_partno=BB-BONE-AUDI-02
##enable BBB: eMMC Flasher:
##make sure, these tools are installed: dosfstools rsync
#cmdline=init=/opt/scripts/tools/eMMC/init-eMMC-flasher-v3.sh
As you see in this output the line that should be changed in your "uEnv.txt", is colored in blue.
Make that line in your BBB as the blue line and push "ctrl+x" "y" "enter"
now when you reboot your BBB it will come up on LCD.